Thursday, March 31, 2011

Rainbow colored Easter Cookies

I absolutely loved working on this food project, it has been so fun and colorful. When I first came upon this recipe it was for red, white and blue cookies but I decided to make them more spring like. I think my orange is too orangey but that's okay. I also solved numerous problems I had along the way and now you'll have no issues at all in making these fun cookies. 
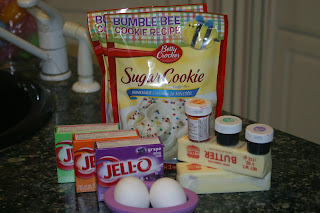

Ingredients
2 pouches Betty Crocker sugar cookie Mix
2/3 c butter nearly melted 
and cooled slightly
2 eggs
Orange, teal and purple food coloring
1 TBSP of orange Jell-O
1 TBSP blue Jell-O
1 TBSP grape Jell-O

Line an 8x4 inch loaf pan with wax paper, extending paper over sides of pan
In a mixer beat butter and eggs, add the sugar cookie mixes and beat until just combined. Divide the dough into three equal parts and place in bowls, add orange jell-O and orange food coloring to one part. knead with your hands in the bowl until the jell-O is mixed in, then pick up dough and knead until color is combined. Divide orange colored dough into 2 equal parts. Repeat with blue and grape jell-O and colorings until you have 6 balls of dough. Pat a layer of orange dough in bottom of loaf pan. Press gently with the back of a dry measuring cup to even out the dough. Add each color until you have 6 separate layers. Wrap remaining wax paper over sides of dough and cover with foil and refrigerate for a few hours. 

Prepare cookie sheets and preheat oven to 375. Take the chilled dough out of fridge and dump onto a prepared work surface. Cut dough in half and stack on top of first layer, so now you have 12 layers. Slice into thickish slices and use cookie cutter to cut out desired shapes. Place on baking sheet and freeze for 10 minutes, this helps retain shape while cooking. Bake for 10 minutes or until done.  Cool and decorate. 
Ingredients
prepare your 8x4 pan
Separate dough into 3 bowls
Orange jell-O and orange food coloring
Nice colors
Ready to pan
This is my second layer going on
Using a measuring cup to level the dough
All done
Wrap up dough and stick in fridge
Dump dough on cutting surface
Isn't it cool looking?
I got smart quickly and realized I needed to make
my dough higher, so I cut the loaf in half
and squished it into one tall loaf
Slice some off and start cooking cutting
I took all of the scraps and put them into one gorgeous pile,
nice marbling 
Ready for the oven
Space yours out a little more than mine,
freeze for 10 minutes before baking
Ready to frost
My cute neighbor Lucy helped me out
She loved putting eyeballs on the bunny's faces
Now if you have a problem where the cookies spread while cooking don't panic

Let them sit for 3 minutes after they come out of the oven and
use your cookie cutter again on the cooked cookie,
eat the scraps. 
Lucy decorated these
She loved the blue sprinkles
Aren't these cute?
Get creative and have fun!
I love the marbleized ones the best

Enjoy!


Source: The Cooking Photographer

Wednesday, March 30, 2011

Oven Roasted Cauliflower

We love veggies in our house, and yes I know how lucky I am. My kids gobble them up whenever they get the chance, which is a good thing, and I try to come up with different ways of preparing them so we don't get tired of the same old thing. Yesterday I bought a gorgeous head of cauliflower and roasted it in the oven, it turned out so delicious that I stood at my center island picking at the leftovers while loading the dishwasher. Sometimes the best recipes are the easiest ones.

Ingredients
1 head cauliflower
4 cloves garlic, sliced
Olive Oil
Salt and Pepper to taste

Preheat oven to 375. Roughly cut up cauliflower and place on a cookie sheet. Pour enough olive oil over cauliflower to lightly coat. Throw on the garlic and heavily salt and pepper. Dig your hands in and rub everything into the cauliflower. Place in oven and cook for 20-25 minutes. Serve immediately.
Ready to go into the oven
Enjoy!

Tuesday, March 29, 2011

Getting Organized

I will admit that my pantry has more cookie and cake decorating tools in it than food, and that is sort of a problem. I do have a large walk in pantry, but I am always digging behind things trying to find the right cookie cutters or jimmies, so I decided to get myself organized. I headed to Wal-Mart and picked up 2 storage bins, of course the first trip I made I only bought one and had to go back a second time. I store my bins in a little alcove off the kitchen and wheel them in when I want them. So easy and organized!

It took Olivia and I at least 20 minutes
to locate all of the stuff that I've
stashed around the house
My sprinkles use to fit in that bin, not now
Too much stuff
Plus there are the cookie cutters to deal with
Where to put everything?
One drawer has cupcake liners, this is now full
with all of the ones I found in my
craft room yesterday
Drawer 1 of sprinkles
Drawer 2 of sprinkles
One drawer of icing bottles and toppers
Tips and coloring gels
I had to go and buy a second drawer set
to store my cookie cutters
2 drawers of cutters
Celo bags to store all of my homemade goodies in
Pretty cute and definitely organized!
I guess I should remove those tags off the front huh??

Enjoy!

Monday, March 28, 2011

Just do it

I recently heard this man speak and he inspired me so much. Nick made me realize that what I already had in life is enough, no need to achieve perfection, just be yourself. Perfection is boring, be exciting, be you! I know this post has nothing to do with food, but it does have something to do with me, and that's something that I try to live by daily. You've got to grab life by the horns and have fun, every single day!

Nike ad…..

You were born a daughter.
You looked up to your mother.
You looked up to your father.
You looked up at everyone.
You wanted to be a princess.
You thought you were a princess.
You wanted to own a horse.
You wanted to be a horse.
You wanted your brother to be a horse.
You wanted to wear pink.
You never wanted to wear pink.
You wanted to be a Veterinarian.
You wanted to be President.
You wanted to be the President’s Veterinarian.
You were picked last for the team.
You were the best one on the team.
You refused to be on the team.
You wanted to be good in algebra.
You hid during algebra.
You wanted the boys to notice you.
You were afraid the boys would notice you.
You started to get acne.
You started to get breasts.
You started to get acne that was bigger than your breasts.
You wouldn’t wear a bra.
You couldn’t wait to wear a bra.
You couldn’t fit into a bra.
You didn’t like the way you looked.
You didn’t like the way your parents looked.
You didn’t want to grow up.
You had your first best friend.
You had your first date.
You had your second best friend.
You had your second first date.
You spent hours on the telephone.
You got kissed.
You got to kiss back.
You went to the prom.
You didn’t go to the prom.
You went to the prom with the wrong person.
You spent hours on the telephone.
You fell in love.
You fell in love.
You fell in love.
You lost your best friend.
You lost your other best friend.
You really fell in love.
You became a steady girlfriend.
You became a significant other.
YOU BECAME SIGNIFICANT TO YOURSELF.
Sooner or later, you start taking yourself seriously. You know when you need a break. You know when you need a rest. You know what to get worked up about and what to get rid of. And you know when it’s time to take care of yourself, for yourself. To do something that makes you stronger, faster, more complete.
Because you know it’s never too late to have a life. And never too late to change one.
JUST DO IT


Enjoy!

Chicken Saltimbocca (lightened up)

We celebrated my husband's birthday yesterday and I wanted to make something tasty yet low fat. I found this recipe and was really happy with the results. I did do a little tweaking on it and of course forgot to buy prosciutto, so I had to replace it with ham from my fridge. I served it with brown rice and garlic green beans. I am going to make it again using prosciutto since it's one of our favorite Italian meats.


Ingredients
3 chicken cutlets halved
6 small slices of Prosciutto or ham
6 basil leaves
olive oil
1/4 c flour
1 tsp salt
1 tsp pepper
1 TBSP butter
3/4 c fat free chicken broth
1/4 white wine
can omit wine and use more chicken broth
Arugula


Slice each cutlet in half so that you have 6 pieces, pound pieces until 1/4 inch thick. Lay prosciutto or ham  on top of chicken cutlet then place a piece of basil on top of that. Fold chicken in half and lightly pound edges to seal. Dredge in flour that you've seasoned with salt and pepper. Heat olive oil in skillet and fry chicken 1-2 minutes per side. Remove chicken and set aside. Add wine to pan to deglaze, add chicken broth and butter while stirring. Return chicken to pan and let simmer until chicken has fully cooked, at least another 5-10 minutes. Serve over arugula and top with sauce.
Makes 6 smaller portions or 3 large ones. My husband and I ate 2 pieces to equal 1 cutlet, my daughter only ate 1 piece of chicken.
Ingredients
Slice chicken cutlets into half
Pound until they are 1/4 inch thick
Place basil and prosciutto or ham on top of
chicken. Sorry missing pic of ham being added
Place chicken pocket in flour and dredge
Cook in pan for 1-2 minutes per side,
then remove
Add wine to deglaze pan
Add chicken broth and butter, the
sauce thickens up quickly
Return chicken to pan and cook until done
See how it's still not cooked? Keep simmering
Now it's done
Place on a plate of arugula
and pour sauce from pan on top of chicken

Enjoy!


 Source: Adapted from Ginas Skinny Recipes